#include <iostream>
#include <fstream>
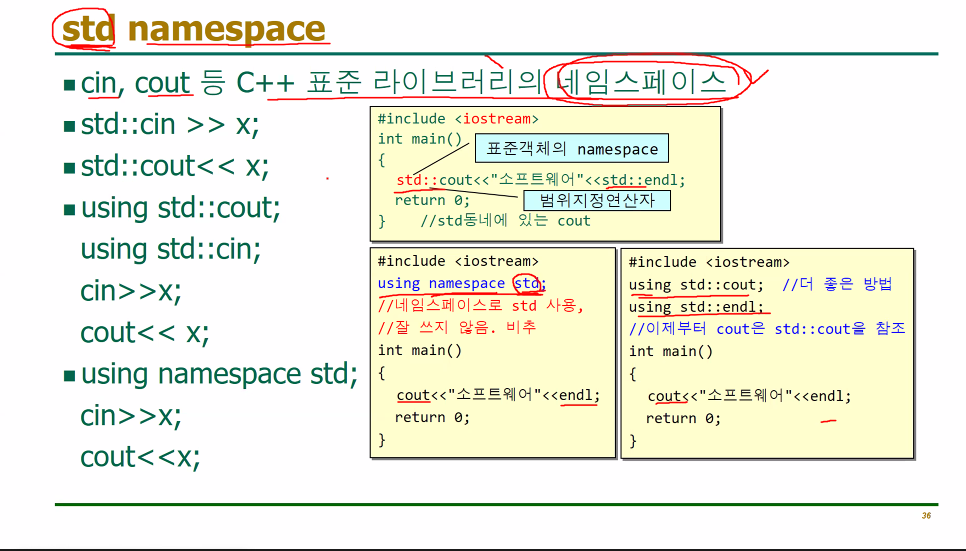
using namespace std;
int main()
{//abc.txt파일에 자신의 이름 저장하기
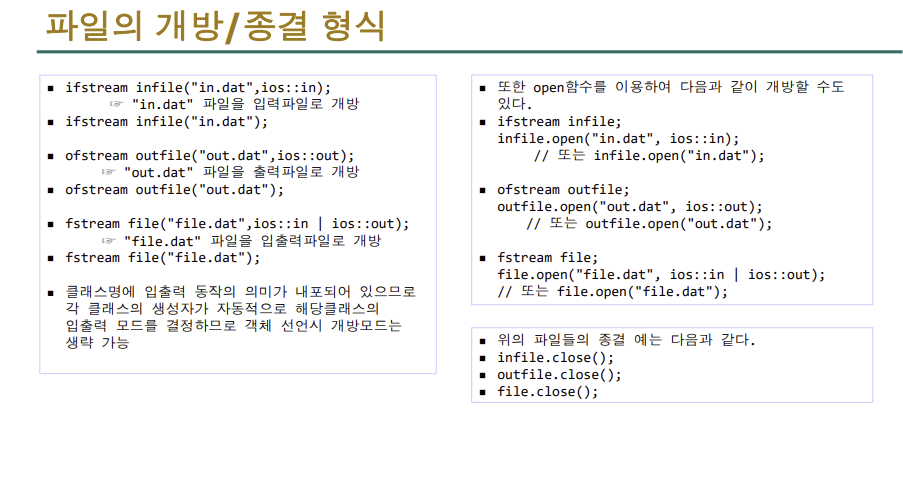
ofstream xxx("abc.txt"); // 출력파일 스트림 객체 hout 선언
xxx << "kdh\n";
xxx.close(); //파일 종결
return 0;
}
#include <iostream>
#include <fstream>
using namespace std;
int main()
{//만들어 놓았던 데이터를 불러올때 사용하는 방법(hin만는거)
	ifstream hin("test.txt"); // 입력파일 스트림 객체 hin 선언
	if (!hin) {
		cout << "입력할 파일을 열 수 없습니다.";
		return 1;
	}
	char str[50];
	int i, j;
	hin >> str >> i >> j;
	cout << str << " " << i << " " << j << endl;
	hin.close(); // 파일 종결
	return 0;
}
#include <iostream>
#include <fstream>
using namespace std;
int main()
{
	ofstream hout("test.txt");//파일입출력을 할때는ofstream으로 저장
	if (!hout) {
		cout << "출력할 파일을 열 수 없음.";
		return 1;
	}
	hout << "HanSH\n";
	hout.close();
	ifstream hin("test.txt");//파일을 불러올때는ifstream으로 불러옴
	if (!hin) {
		cout << "입력할 파일을 열 수 없음.";
		return 1;
	}
	char str[50];
	hin >> str;
	cout << str << endl;
	hin.close();
	return 0;
}
#include <iostream>
#include <fstream>
using namespace std;
int main()
{//출력ofstream 입력ifstream
	char ch;
	ifstream hin("test.txt");
	if (!hin) {
		cout << "입력할 화일을 열 수 없음";
		return 1;
	}
	hin.unsetf(ios::skipws);//공백 무시x
	while (!hin.eof()) {
		hin >> ch;
		if (ch == ' ') ch = '*';
		cout << ch;
	}
	hin.close();
	return 0;
}
#include <iostream>
using std::cout;
using std::endl;
int main(void)
{
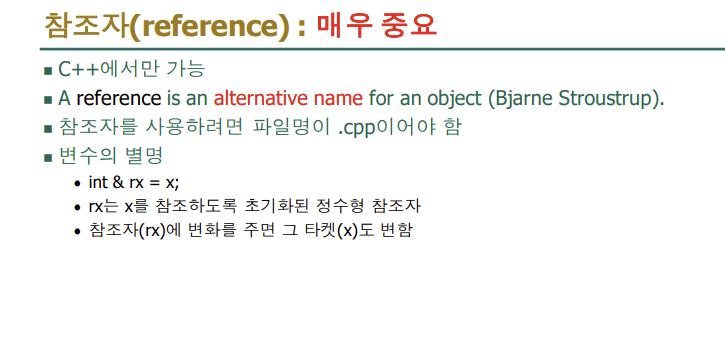
int x = 10;
int& rx = x;//rx는 x의 참조자
cout << x << " " << rx << endl;
rx = rx + 10;
cout << x << " " << rx << endl; //참조자(rx)에 변화를 주면 그 타켓(x)도 변함
x = x + 10;
cout << x << " " << rx << endl; //타켓(x)에 변화를 주면 그 참조자(rx)도 변함
return 0;
}
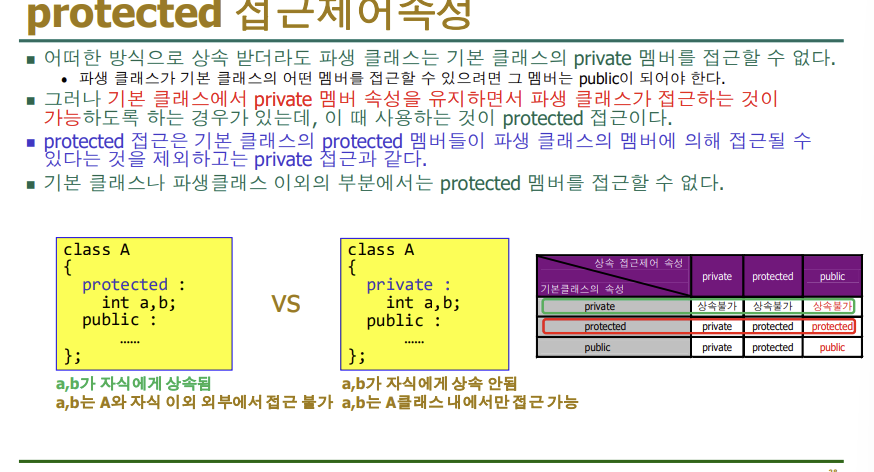
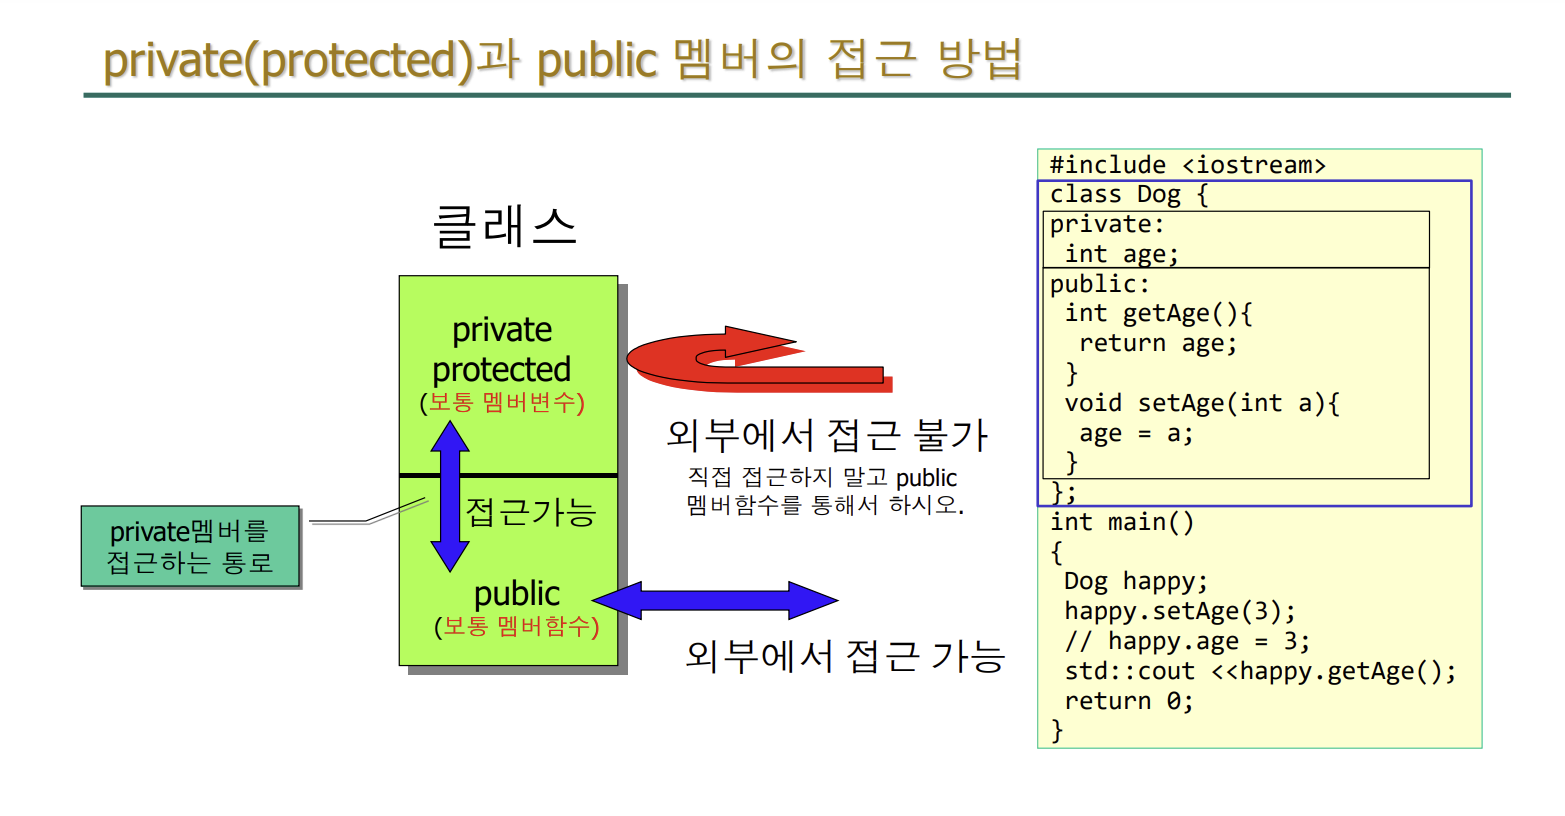
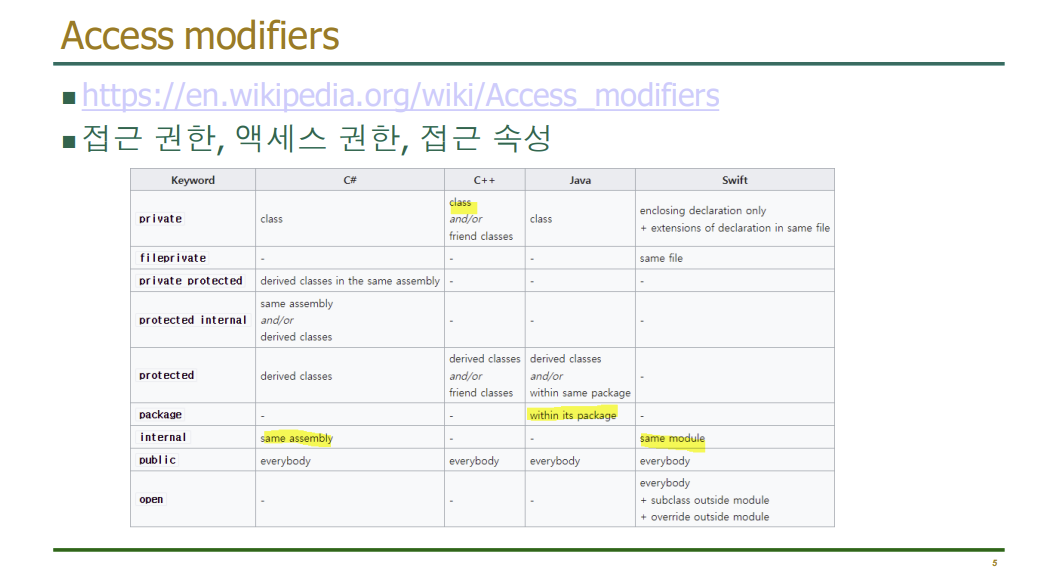
공통점: 두 접근 제어자 모두 클래스의 외부에서 직접 접근이 불가능, 즉 객체를 통해 멤버 변수에 직접 접근하거나 멤 버 변수를 호출하는 것이 불가능
차이점: 1. private멤버는 해당 클래스의 객체에서만 접근 가능, 즉 동일한 클래스의 다른 객체 똔느 상속받은 자식 클 래스 에서도 접근 불가능
2.protected멤버는 해당 클래스와 동일한 클래스의 다른 객체, 그리고 상속받은 자식 클래스에서 접근이 가 능, 하지만 자식 클래스의 객체를 통해서는 접근이 불가능
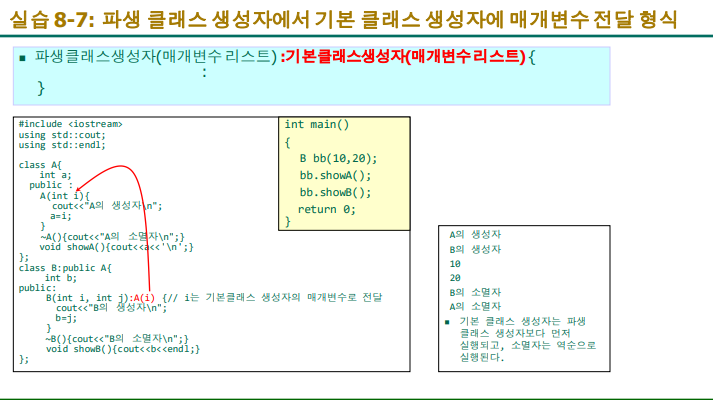
자식쪽에서 부모쪽으로 매개변수를 넘기는 방법 /부모 생성자가 먼저 생성이 되는데 자식쪽에서 부모쪽으로 매개변수를 넘기는 방법이다
파이썬 다중 상속 예시
# 부모 클래스 1
class Parent1:
    def __init__(self):
        self.parent1 = "부모 클래스1"

    def print_parent1(self):
        print(self.parent1)

# 부모 클래스 2
class Parent2:
    def __init__(self):
        self.parent2 = "부모 클래스2"

    def print_parent2(self):
        print(self.parent2)

# 다중 상속을 받는 자식 클래스
class Child(Parent1, Parent2):
    def __init__(self):
        Parent1.__init__(self)  # 부모 클래스1의 생성자 호출
        Parent2.__init__(self)  # 부모 클래스2의 생성자 호출
        self.child = "자식 클래스"

    def print_child(self):
        print(self.child)

if __name__ == "__main__":
    child = Child()
    child.print_parent1()  # 부모 클래스1의 메소드 호출
    child.print_parent2()  # 부모
2개의 기본 클래스 상속1
#include <iostream>
using std::cout;
using std::endl;
class A1 // 아버지
{
	int a;
public:
	A1(int i) { a = i; }
	int getA() { return a; }
};
class A2 // 어머니
{
	int b;
public:
	A2(int i) { b = i; }
	int getB() { return b; }
};
class B :public A1, public A2
{
	// 기본 클래스 A1과 A2로부터
	// 상속 받은 파생 클래스
	int c;
public:
	B(int i, int j, int k) :A1(i), A2(j) { c = k; }
	// i는 기본클래스 A1의 생성자로,
	// j는 기본클래스 A2의 생성자로
	// 각각 매개변수 전달, { c = k; }초기화 하는것
	void show() {
		cout << getA() << ' ' << getB() << ' ' << c << endl;
	}
};
int main()
{
	B bb(1, 2, 3);
	bb.show();
	return 0;
}
여러 개의 기본 클래스를 상속 받을 때, 생성자와 소멸자의실행 순서
#include <iostream>
using std::cout;
class A1 // 기본 클래스 1
{
	int a;
public:
	A1() { cout << "A1의 생성자.\n"; }
	~A1() { cout << "A1의 소멸자.\n"; }
};
class A2 // 기본 클래스 2
{
	int b;
public:
	A2() { cout << "A2의 생성자.\n"; }
	~A2() { cout << "A2의 소멸자.\n"; }
};
class B : public A1, public A2
	// 기본 클래스 1과 2로부터
	// 상속 받은 파생 클래스
{
	int c;
public:
	B() { cout << "B의 생성자.\n"; }
	~B() { cout << "B의 소멸자.\n"; }//부모에 쓰는 생성자는 먼저 쓰는 순서대로/ 소멸자는 역순으로 호출한다
};
int main()
{
	B bb;
	return 0;
}
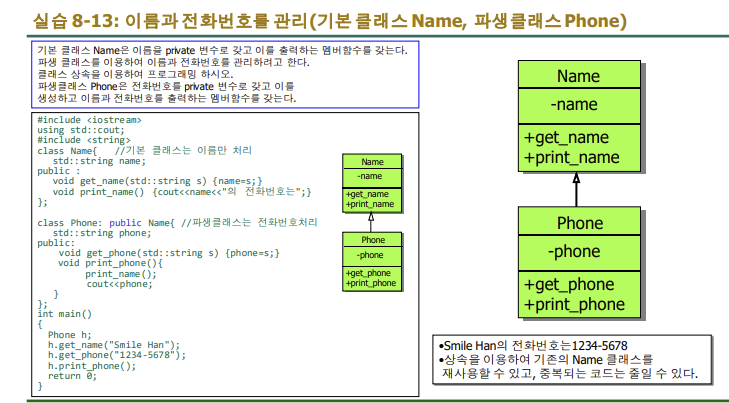
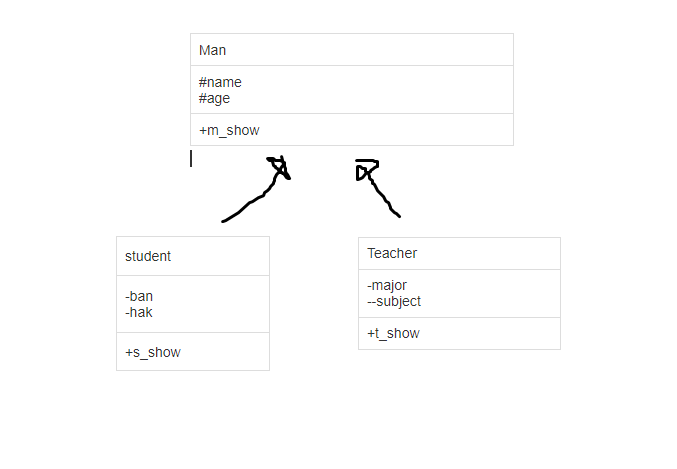
클래스 다이어그램: 위에는 부모 아래는 자식, 자식에서 부모로 화살표(색x)
부모 클래스 완성( 사람클래스(Man,멤버변수:이름,나이)를 만드시오.)
#include<iostream>
//using namespace std;
using std::cout;
using std::endl;
using std::string;
class Man {
	string name;
	int age;
public:
	Man(std::string n, int a) {
		name = n;//초기화
		age = a;
	}
	void m_show() {
		cout << "이름:" << name << endl;
		cout << "나이:" << age << endl;
	}
};
#include<iostream>
//using namespace std;
using std::cout;
using std::endl;
using std::string;
class Man {
	string name;
	int age;
public:
	Man(string name, int age) {
		this->name = name;//초기화
		this->age = age;
}
	//Man(string n, int a) {
	//	name = n;//초기화
	//	age = a;
	//}

	void m_show() {
		cout << "이름:" << name << endl;
		cout << "나이:" << age << endl;
	}
};

class Student : public Man{
	string ban;
	string hak;
	Student(string n, int a, string b, string h) :Man(n,a) {

		ban = b;
		hak = h;
	}
	void s_show() {
		m_show();
		cout << "반:" << ban << endl;
		cout << "학번:" << hak << endl;

	}
};

class Teacher : public Man {
	string major;
	string subject;
	Teacher(string n, int a, string m, string s) :Man(n, a) {

		major = m;
		subject = s;
	}
	void t_show() {
		m_show();
		cout << "전공:" << major << endl;
		cout << "담당과목:" << subject << endl;

	}
};
완성
#include<iostream>
//using namespace std;
using std::cout;
using std::endl;
using std::string;
class Man {
protected:
	string name;
	int age;
public:
	Man(string name, int age) {
		this->name = name;//초기화
		this->age = age;
}
	//Man(string n, int a) {
	//	name = n;//초기화
	//	age = a;
	//}

	void m_show() {
		cout << "이름:" << name << endl;
		cout << "나이:" << age << endl;
	}
};

class Student : public Man{
	string ban;
	string hak;
public:
	Student(string n, int a, string b, string h) :Man(n,a) {

		ban = b;
		hak = h;

	}
	void s_show() {
		m_show();
		cout << "반:" << ban << endl;
		cout << "학번:" << hak << endl;

	}
};

class Teacher : public Man {
	string major;
	string subject;
public:
	Teacher(string n, int a, string m, string s) :Man(n, a) {

		major = m;
		subject = s;
	}
	void t_show() {
		m_show();
		cout << "전공:" << major << endl;
		cout << "담당과목:" << subject << endl;

	}
};


int main()
{
	Student kks("김컴소", 20, "C반", "202012000");
	Teacher hsh("한미소", 40, "전산", "C++프로그래밍");
	kks.s_show();
	hsh.t_show();
	return 0;
}
#include <iostream>
using std::cout;
class Dot {//부모클래스
public:
	virtual void draw() {cout << "Dot::draw()\n";}//virtual꼭 필요
	void print() {
	cout << "Dot 클래스\n";
	draw();//draw함수 호출
		}
	};
	class Line :public Dot { //자식클래스
	public:
		void draw() {//void draw() override ,override는 써도 안써도 상관없음
			cout <<"Line::draw()\n";}
		};
		int main() {
			Line line;
			line.print();
			return 0;
		}
# 부모 클래스
class Animal:
    def eat(self):
        print("Eating...")

# 자식 클래스
class Cat(Animal):
    def meow(self):
        print("Meow!")

cat = Cat()
cat.eat()  # "Eating..." 출력
cat.meow()  # "Meow!" 출력
2.java
// 부모 클래스
public class Animal {
    public void eat() {
        System.out.println("Eating...");
    }
}

// 자식 클래스
public class Cat extends Animal {
    public void meow() {
        System.out.println("Meow!");
    }
}

// 메인 클래스
public class Main {
    public static void main(String[] args) {
        Cat cat = new Cat();
        cat.eat();  // "Eating..." 출력
        cat.meow();  // "Meow!" 출력
    }
}
3.javascript
// 부모 클래스
class Animal {
    eat() {
        console.log("Eating...");
    }
}

// 자식 클래스
class Cat extends Animal {
    meow() {
        console.log("Meow!");
    }
}

const cat = new Cat();
cat.eat();  // "Eating..." 출력
cat.meow();  // "Meow!" 출력
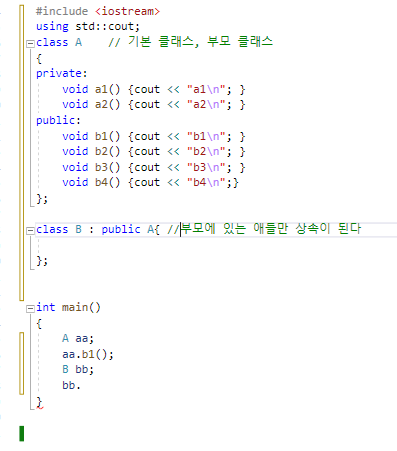
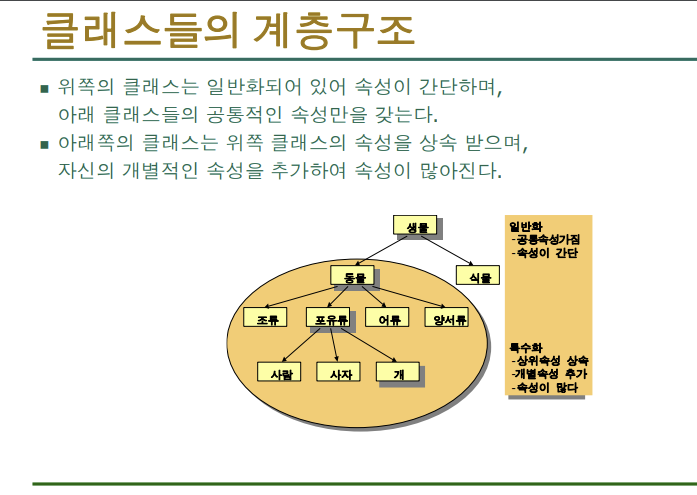
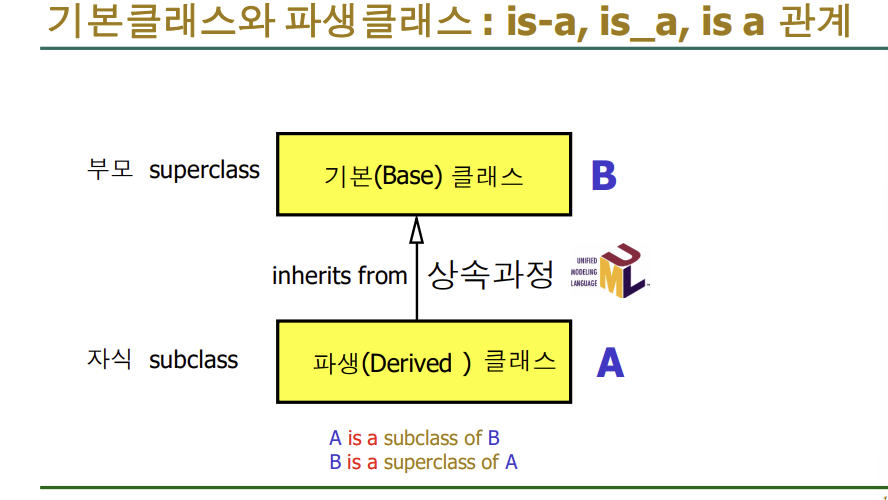
- 상속은 부모 자식간의 관계 : 멋있게(?) 말할때는 is a관계라고 한다
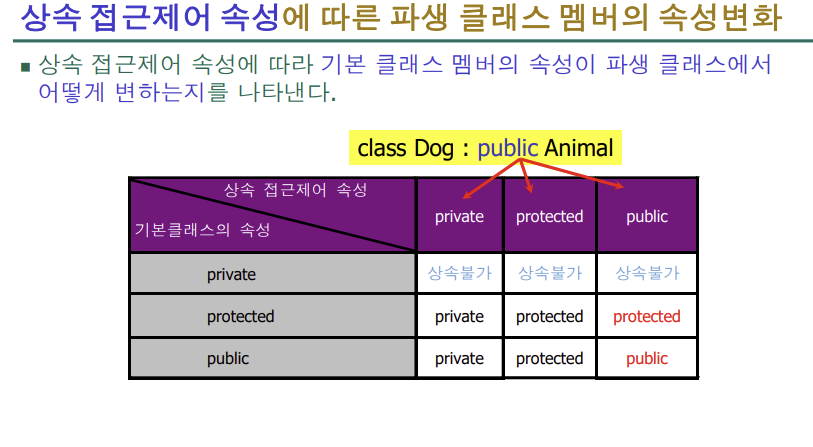
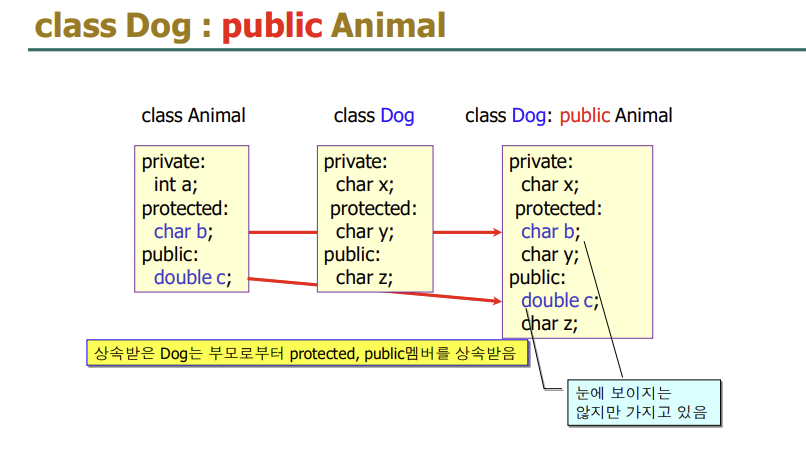
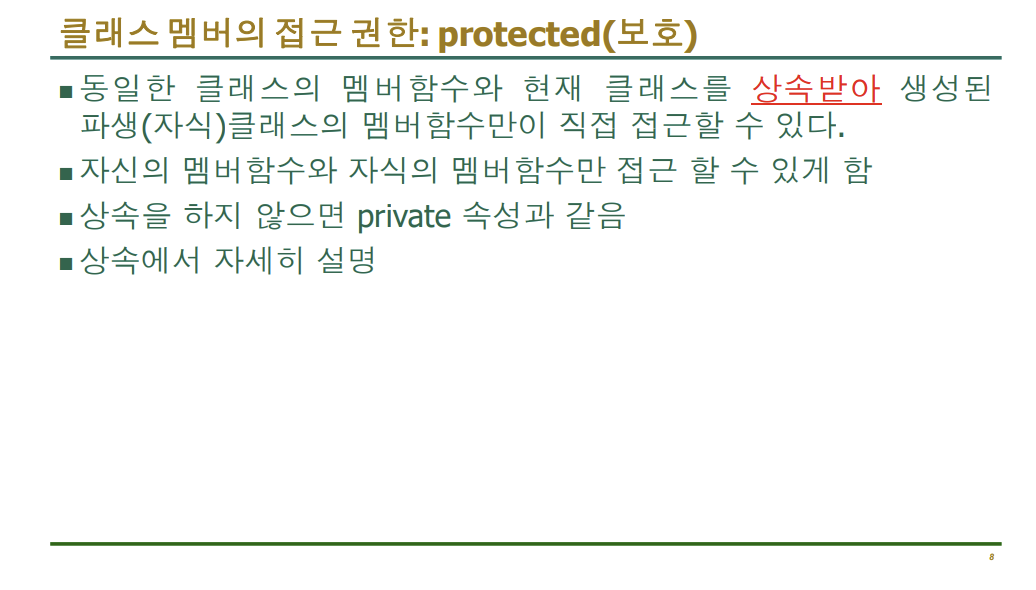
private를 제외하고 모두 물려 받는다
부모의 protected와 public이 그대로 자식에게 돌아온다
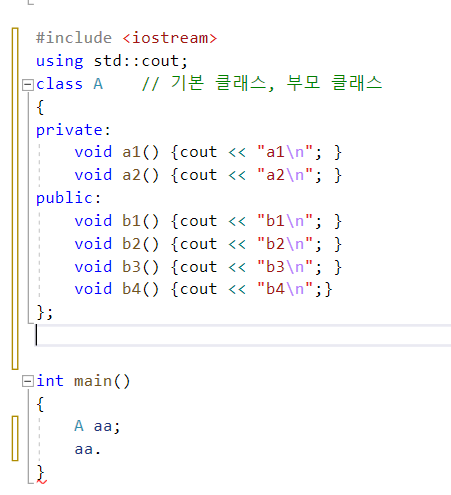
 #include <iostream>
using std::cout;
using std::endl;
class A // 기본 클래스
{
	int x;//생략가능
public:
	void setX (int i) {x =i;}
	void showX() { cout << x << endl; }
};
class B:public A //파생 클래스
{
	//아무 것도 없어요. 그러나!
};
int main() {
	A aa;
	aa.setX(1);
	aa.showX(); B bb;
	bb.setX(10);
	bb.showX();
	return 0;
}
#include <iostream>
using std::cout;
using std::endl;

class A // 기본 클래스 A 선언
{
int x; // private 멤버 변수 x
public:
void setX(int i) { x = i; } // x에 값을 설정하는 public 멤버 함수
void showX() { cout << x << endl; } // x의 값을 출력하는 public 멤버 함수
};

class B :public A // A 클래스를 상속받는 파생 클래스 B 선언
{
int y; // private 멤버 변수 y
public:
void setY(int i) { y = i; } // y에 값을 설정하는 public 멤버 함수
void showY() { cout << y << endl; } // y의 값을 출력하는 public 멤버 함수
};

int main()
{
B bb; // B 클래스의 객체 bb 생성
bb.setX(1); // bb 객체의 x값을 1로 설정 (A 클래스의 메서드 이용)
bb.setY(2); // bb 객체의 y값을 2로 설정 (B 클래스의 메서드 이용)
bb.showX(); // bb 객체의 x값 출력 (A 클래스의 메서드 이용)
bb.showY(); // bb 객체의 y값 출력 (B 클래스의 메서드 이용)
return 0;
}
#include <iostream>
using std::cout;
using std::endl;
class A
{
	int x;//private 생략 가능
public:
	void setX(int i) { x = i; }
	void showX() { cout << x << endl; }
};
class B :public A
{
	int y;
public:
	void setY(int i) { y = i; }
	void
		showXY() { showX();  cout << y << endl; }
};
int main()
{
	B bb;
	bb.setX(1); // 기본클래스의 멤버접근
	bb.setY(2); // 파생클래스의 멤버접근
	bb.showX(); // 기본클래스의 멤버접근
	bb.showXY(); // 파생클래스의 멤버접근
	return 0;
}
In-class member initializers:클래스 안에서 멤버 변수를 바로 초기화하는 방법
#include <iostream>
using std::cout;
using std::endl;
class A
{
	int x = 1;
public:
	A() { x = 2; } //(=A():x(2){})

	void setX(int i) { x = i; }
	int getX() { return x; }
};
int main()
{
	A a1; //디폴트 생성자는 사라짐
	cout << a1.getX() << endl;
	return 0;
}
#include <iostream>
using std::cout;
using std::endl;
class A
{
int x;
public:
void setX(int i) { x = i; }
void showX() { cout << x << endl; }
};
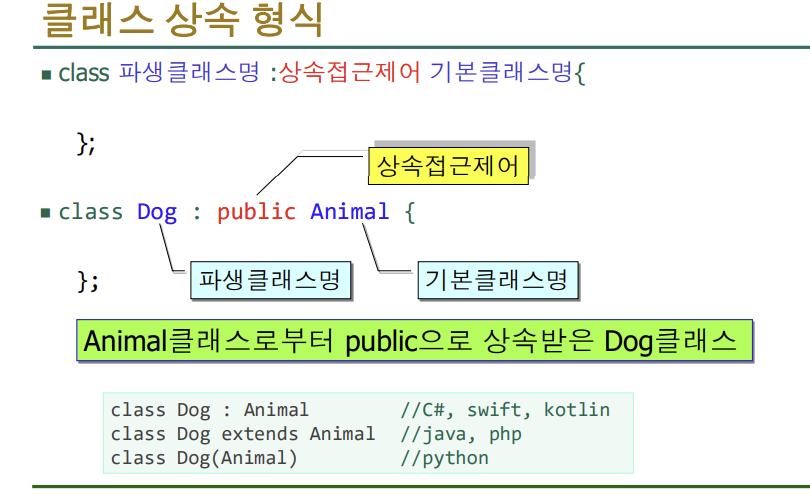
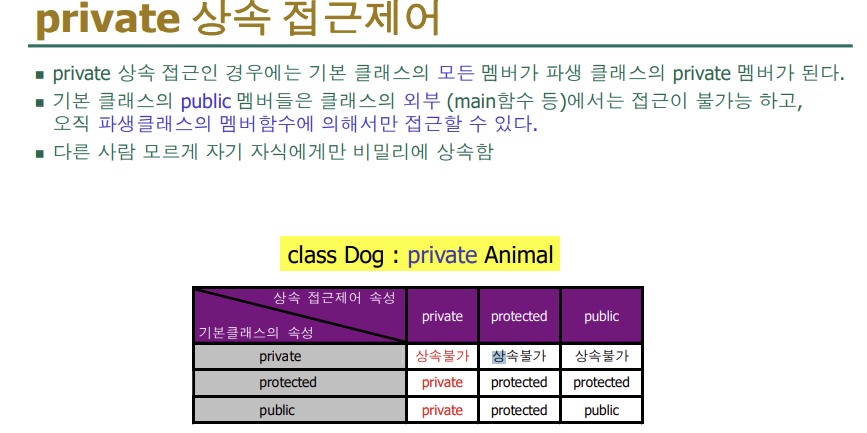
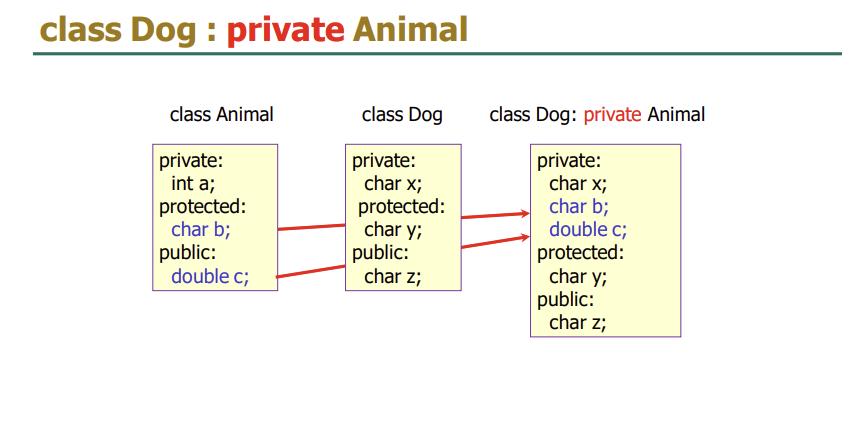
class B :private A //비공개적으로 상속받는다/ 자식만 사용가능, 그래서 setX와 ShowX를 사용
{
int y;
public:
void setXY(int i, int j) { setX(i); y = j; }
// 기본 클래스의 public 멤버 접근
void showXY() { showX(); cout << y << endl; }
};
int main()
{
B bb;
bb.setXY(1, 2); // 파생클래스의 멤버접근
bb.showXY(); // 파생클래스의 멤버접근
return 0;
}
protected부분이 없으면 private부분으로 상속된다
protected, private공통점 외부에서 둘다 접근 불가
차이점: protected는 자식에게 상속가능, private는 자식에게 상속 불가
-부모에서는 항상 private를 썼는데 자식에게 물려줄려면 protected를 사용하는 것이 좋다
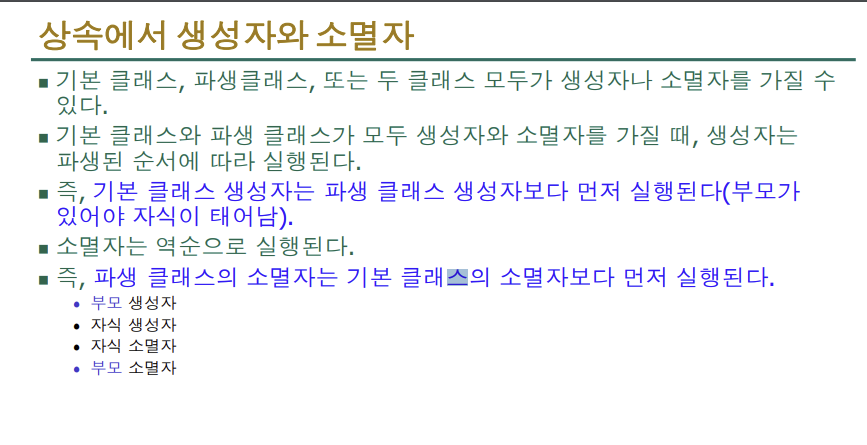
-생성자는 부모꺼먼저 그리고 자식
-소멸자는 자식먼저 호출이 되고 부모
#include <iostream>
using std::cout;
using std::endl;
class A //할아버지
{
	int a;
public:
	A(int i) { a = i; }
	int getA() { return a; }
};
class B :public A //아버지
{
	int b;
public:
	B(int i, int j) :A(i) {
		// i는 기본 클래스 A의
		//생성자 매개변수로 전달됨
		b = j;
	}
	int getB() { return b; }
};
class C :public B //자식
{
	int c;
public:
	C(int i, int j, int k) :B(i, j) {
		// i, j는 클래스 B의 생성자 매개변수로 전달됨
		c = k;
	}
	void show() {
		cout << getA() << ' ' << getB() << ' ' << c << endl;
	}
};
int main()
{
	C cc(10, 20, 30);
	cc.show();
	cout << cc.getA() << ' ' << cc.getB() << endl;
	return 0;
}
다중상속의 접근 방식이 public상속
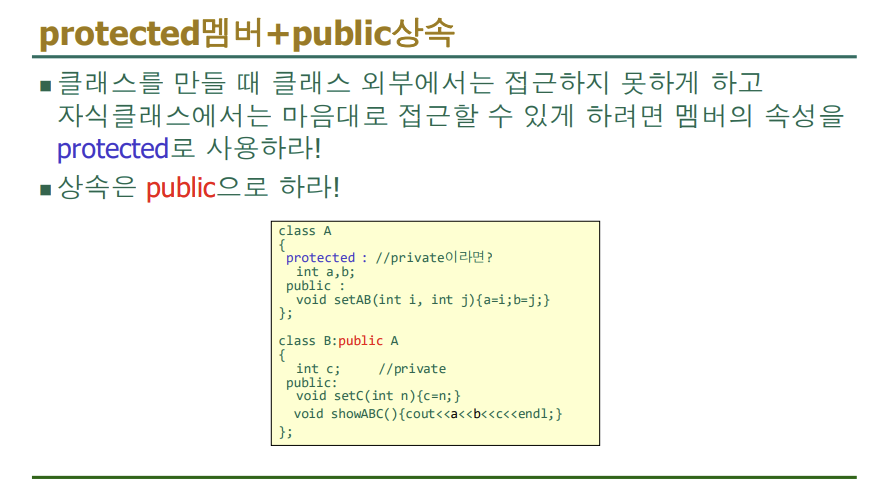
#include <iostream>
using std::cout;
using std::endl;
class A
{
protected: //private이라면?
	int a, b;
public:
	void setAB(int i, int j) { a = i; b = j; }
};
class B :public A
{
	int c; // private
public:
	void setC(int n) { c = n; }
	void showABC() { cout << a << b << c << endl; }
	//기본 클래스의 protected 멤버들은
	//파생 클래스의 멤버에 의해 접근될 수 있다.
};
int main()
{
	A aa;
	B bb;
	aa.a; //외부에서는 접근불가
	bb.b; //외부에서는 접근불가
	bb.setAB(1, 2);
	bb.setC(3);
	bb.showABC();
	return 0;
}
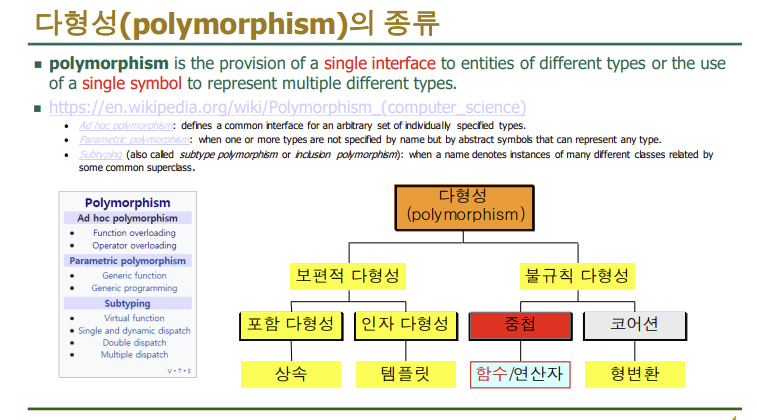
1. 캡슐화: 캡슐화는 객체의 데이터와 그 데이터를 처리하는 함수를 하나로 묶는 것을 말합니다.
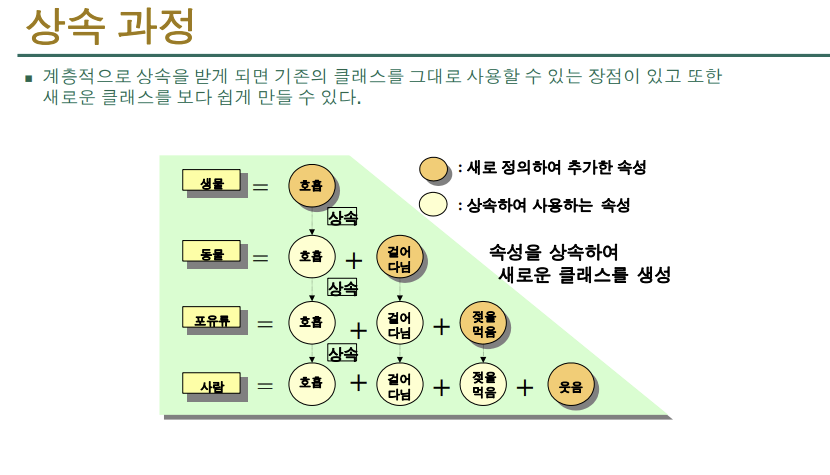
2. 상속: 상속은 기존의 클래스를 확장하여 새로운 클래스를 생성하는 것을 말합니다.
3. 다형성: 다형성은 같은 이름의 메서드가 다른 기능을 수행할 수 있도록 하는 것을 말합니다.
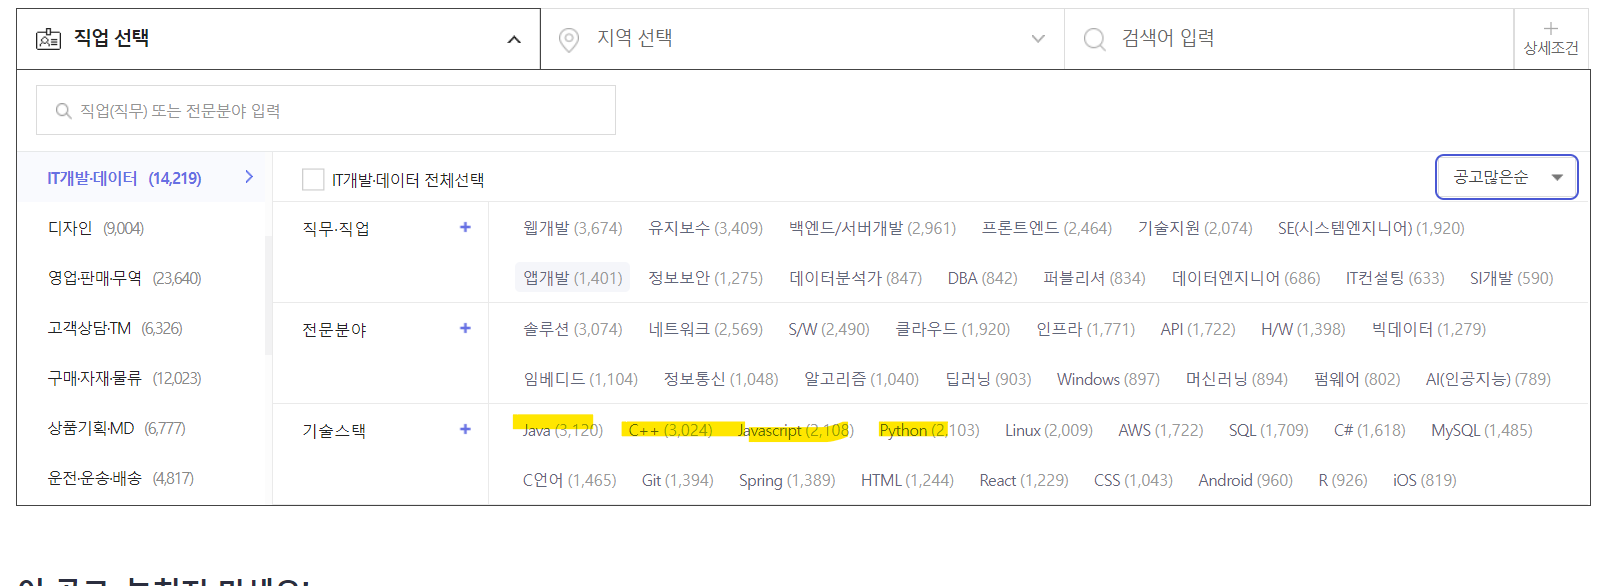
<function overloading을 지원하는 프로그램이 언어>
1. C++
2. Java
3. Python
4. C#
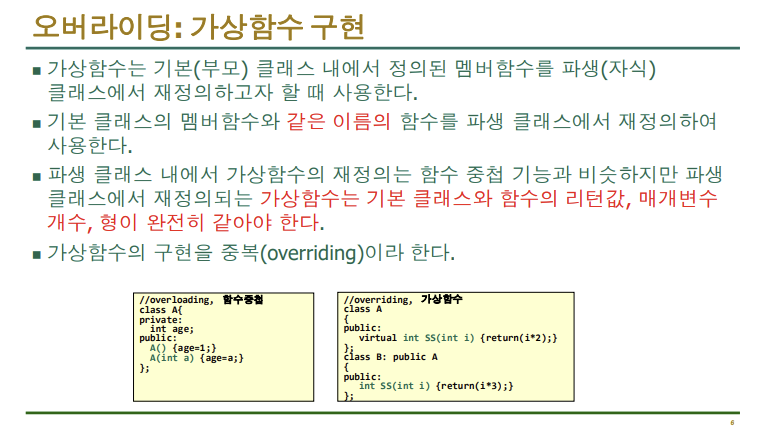
overloading-> overridding
overloading(오버로딩): 이름이 같은 함수가 여러개 있다 (소스를 이해하기 쉬움)
#include <iostream>
int add(int i, int j)
{
	return (i + j);
}
double add(double i, double j)
{
	return (i + j);
}
int main()
{
	std::cout << add(10, 20) << std::endl;
	std::cout << add(10.5, 20.3) << std::endl;
	return 0;
}
컴파일러가 매개변수의 입력 자료형에 따라서 자동적으로 해당 함수를 연결해준다.
#include <iostream>
int add(int i, int j)
{
	return (i + j);
}
double add(double i, double j)
{
	return (i + j);
}
double add(int i, int j)//매개변수가 같으면 오버로딩을 할 수 없다(오류)
{
	return ((double)i + (double)j);
}
int main()
{
	std::cout << add(10, 20) << std::endl;
	std::cout << add(10.5, 20.3) << std::endl;
	return 0;
}
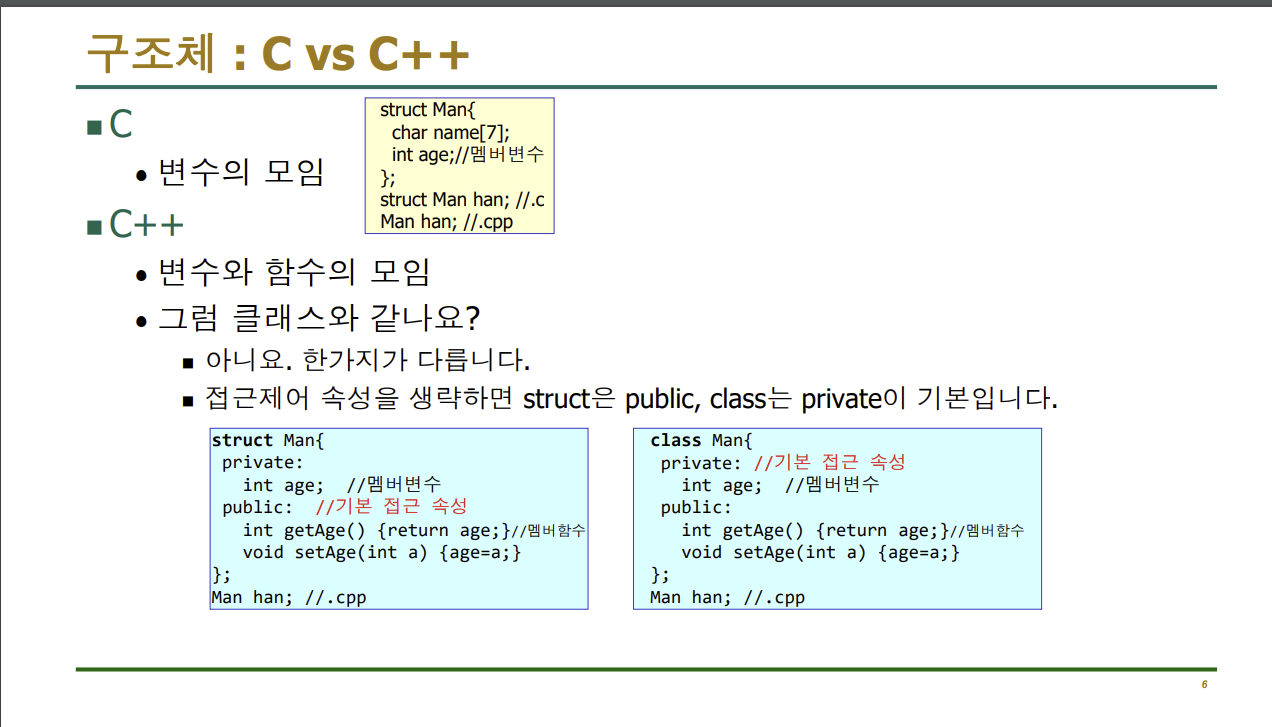
C vs C++
//c
#include <iostream>
int add2(int i, int j)
{
return (i+j);
}
int add3(int i, int j, int k)
{
return (i+j+k);
}
int add4(int i, int j, int k, int l)
{
return (i+j+k+l);
}
int main()
{
std::cout<<add2(1,2)<<std::endl;
std::cout<<add3(1,2,3)<<std::endl;
std::cout<<add4(1,2,3,4)<<std::endl;
return 0;
} //오버로딩 안함
//C++
#include <iostream>
int add(int i, int j)
{
return (i+j);
}
int add(int i, int j, int k)
{
return (i+j+k);
}
int add(int i, int j, int k, int l)
{
return (i+j+k+l);
}
int main()
{
std::cout<<add(1,2)<<std::endl;
std::cout<<add(1,2,3)<<std::endl;
std::cout<<add(1,2,3,4)<<std::endl;
return 0;
} //오버로딩 함
#include <iostream>
int add(int i, int j)//매개변수의 형이 다른 경우
{
	return (i + j);
}
float add(float i, float j)//매개변수의 형이 다른 경우
{
	return (i + j);
}
double add(double i, double j)//매개변수의 형이 다른 경우
{
	return (i + j);
}
int add(int i, int j, int k)//  매개변수의 개수가 다른경우
{
	return (i + j + k);
}
int add(int i, int j, int k, int l)//  매개변수의 개수가 다른경우
{
	return (i + j + k + l);
}
int main()
{
	std::cout << add(1, 2) << std::endl;//매개변수의 형이 다른 경우
	std::cout << add(1.3f, 2.6f) << std::endl;//매개변수의 형이 다른 경우
	std::cout << add(6.5, 3.8) << std::endl;//매개변수의 형이 다른 경우
	std::cout << add(1, 2, 3) << std::endl;//  매개변수의 개수가 다른경우
	std::cout << add(1, 2, 3, 4) << std::endl;//  매개변수의 개수가 다른경우
	return 0;
}
매개변수의 형이 다른 경우와 매개변수의 개수가 다른경우에만 함수 중첩이 가능하다
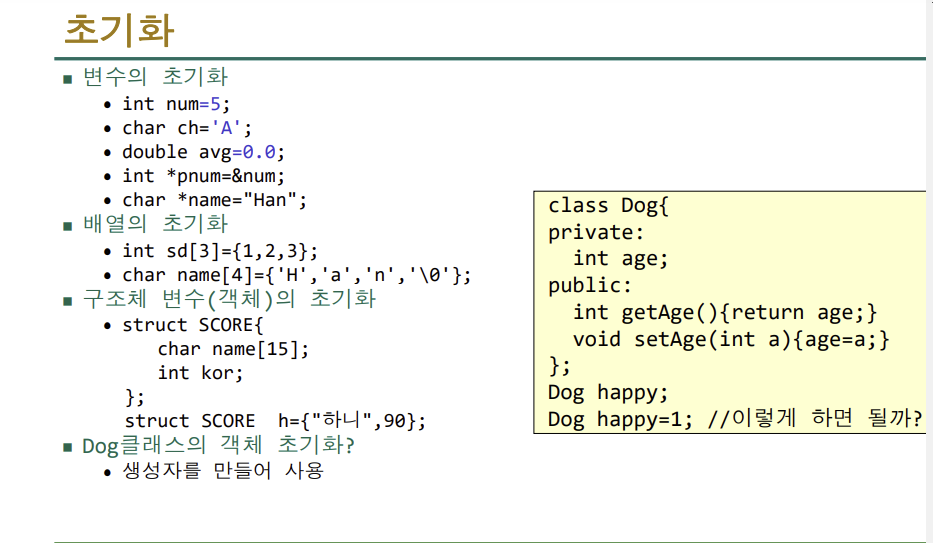
가장 많이 쓰는 오버로딩: 생성자 오버로딩
//생성자 함수 중첩 예
#include <iostream>
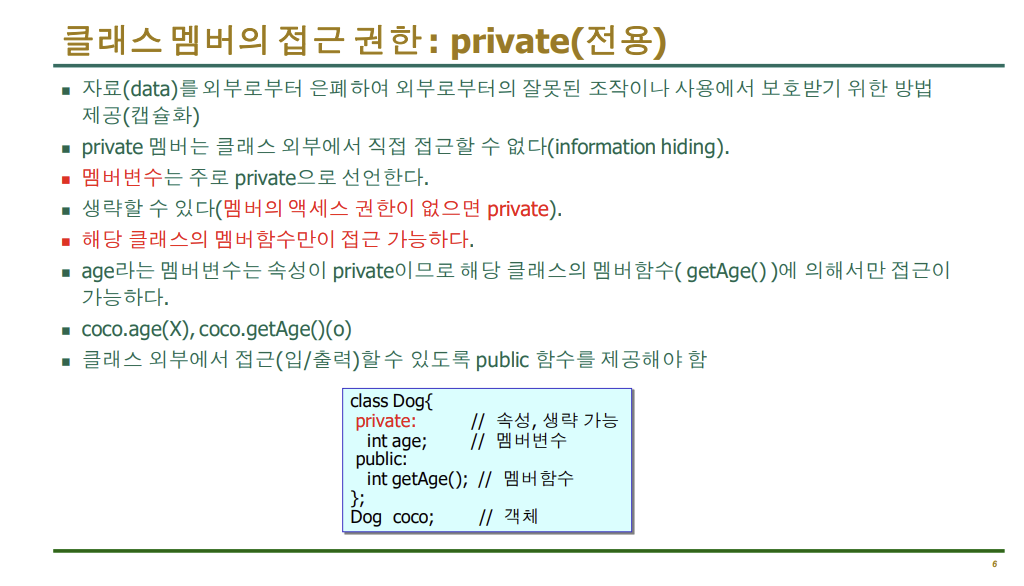
class Dog {
private:
int age;
public:
Dog() { age = 1; } // 매개변수가 없는 생성자, 자동 inline
Dog(int a) { age = a; } // 매개변수가 하나인 생성자
~Dog();
int getAge();
void setAge(int a);
};
Dog::~Dog()
{
std::cout << "소멸";
}
int Dog::getAge()
{
return age;
}
void Dog::setAge(int a)
{
age = a;
}
int main()
{
Dog happy(2), meri;
std::cout << happy.getAge() << "," << meri.getAge();
return 0;
}
<디폴트 매개변수>
-별도의 매개변수를 전달하지 않아도 기본적인 값을 전달하도록 함수 원형을 선언할 때 디폴트 값을 지정할 수 있다
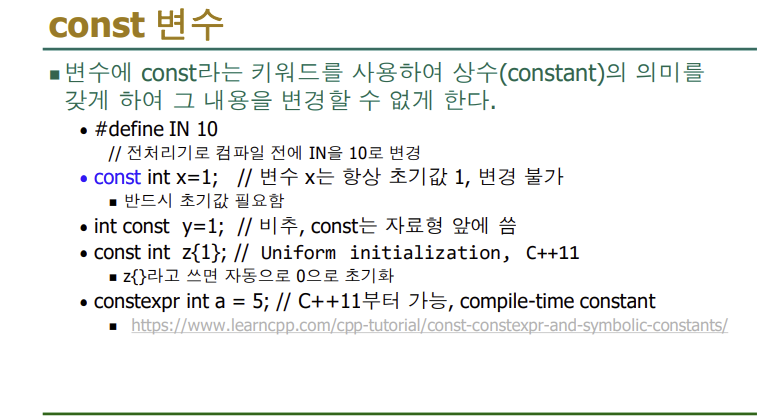
#define IN 1 // 컴파일 전에 IN을 찾아서 1로 바꿈
#include <iostream>
int main()
{
	const int x = 2; // 변수 x는 항상 1, 변경 불가, 초기값 지정해야
	int const y = 3; // 비추, const는 자료형 앞에 씀
	const int z{ 4 }; // Uniform initialization, C++11, z{}
	constexpr int a = 5; //C++11부터 가능, compile-time constant
	//x = 2; //변경 불가
	//y=10;
	//z= 20;
	//const지정을 하면 변경 불가
	std::cout << IN << x << y << z << a;
	return 0;
}
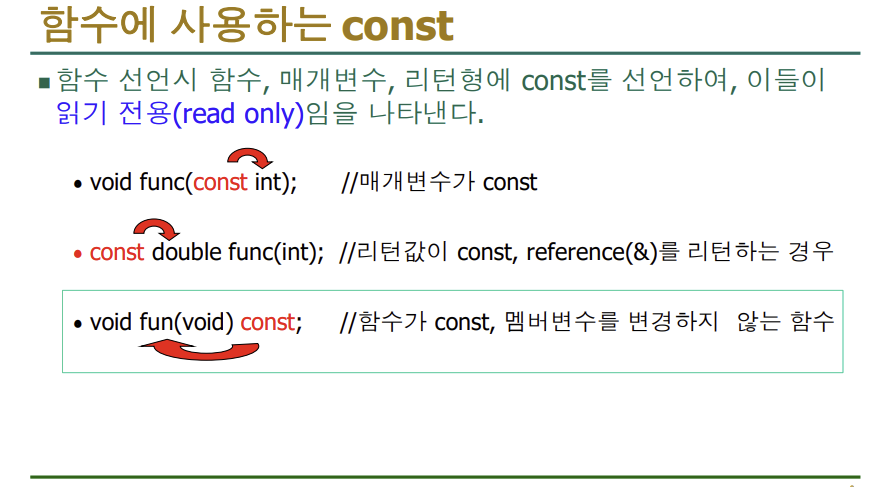
-멤버 변수를 변경하지 않는 함수는 뒤에 const를 쓴다
//오류 수정 전
#include <iostream>
class Dog {
	int age; //private 생략함
public:
	int getAge() const;
	void setAge(int a) { age = a; }
	void view() { std::cout << "나는 view"; }
};
int Dog::getAge() const
{
	view(); // 오류 ①
	return (++age); // 오류 ②
}
int main()
{
	Dog happy;
	happy.setAge(5);
	std::cout << happy.getAge();
	return 0;
}

//수정 후
#include <iostream>
class Dog {
	int age; //private 생략함
public:
	int getAge() const;
	void setAge(int a) { age = a; }
	void view() const
	{
		std::cout << "나는 view";
	}
};
int Dog::getAge() const
{
	view(); // 오류 ① view를 const로 지정해줘야지 호출 가능함
	return age; // 오류 ② 멤버 변수 age를 변경해서 나는 오류
}
int main()
{
	Dog happy;
	happy.setAge(5);
	std::cout << happy.getAge();
	return 0;
}
const함수는 const함수만 호출할 수 있으며 일반 멤버함수에는 접근할 수 없다.
#include <iostream>
class Dog {
	int age; //private 생략함
public:
	int getAge() const;
	void setAge(int a) {
		age = a;
	}//const는 반드시 지정할 필요는 없는데 쓰면 소스를 이해하는데 수월하다


};
int Dog::getAge() const
{

	return age; // 오류 ② 멤버 변수 age를 변경해서 나는 오류
}
int main()
{
	Dog happy;
	happy.setAge(5);
	std::cout << happy.getAge();
	return 0;
}
#include <iostream>
class Dog {
	int age; //private 생략함
public:
	int getAge() const;
	void setAge(int a) {
		age = a;
	}//const는 반드시 지정할 필요는 없는데 쓰면 소스를 이해하는데 수월하다


};

int main()
{
	Dog happy;
	happy.setAge(5);
	std::cout << happy.getAge();
	return 0;
}
#include <iostream>
int main()
{
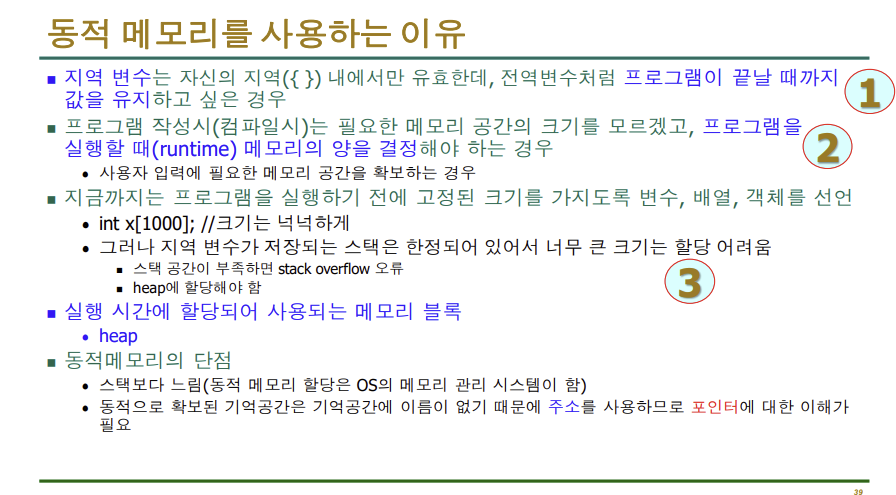
int array[1000000]; //4MB, 지역변수는 스택에 저장하는데 기본 스택 크기를 넘어서 오류
std::cout << "aaaa";
return 0;
}//VS에서 실행될까?
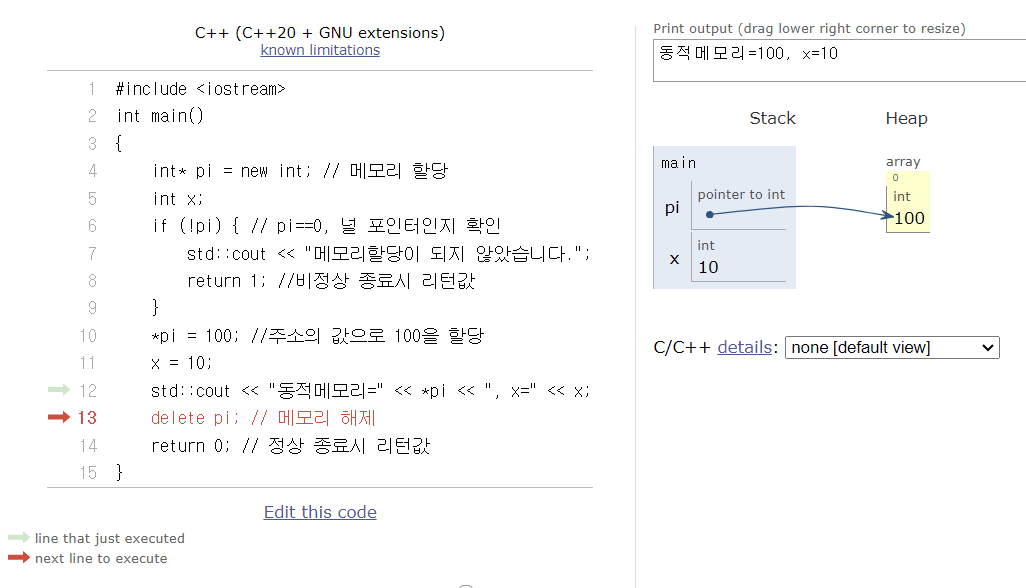
//동적 메모리 할당, 동적 메모리 할당

#include <iostream>
int main()
{
	int *pi = new int; // 동적 메모리 할당, heep
	int x; //정적 메모리 할당, 스택
	if (!pi) { // pi==0, 널 포인터인지 확인
		std::cout << "메모리할당이 되지 않았습니다.";
		return 1; //비정상 종료시 리턴값
	}
	*pi = 100; //주소의 값으로 100을 할당
	x = 10;
	std::cout << "동적메모리=" << *pi << ", x=" << x;
	delete pi; // 메모리 해제
	return 0; // 정상 종료시 리턴값
}
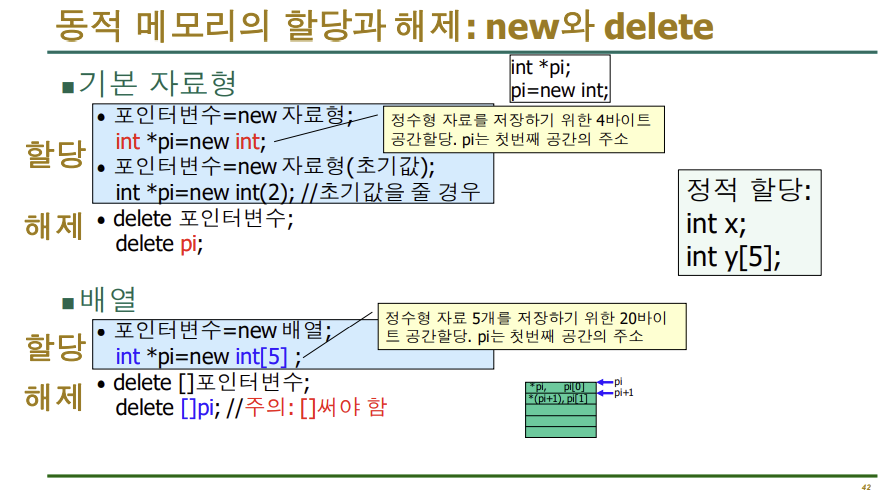
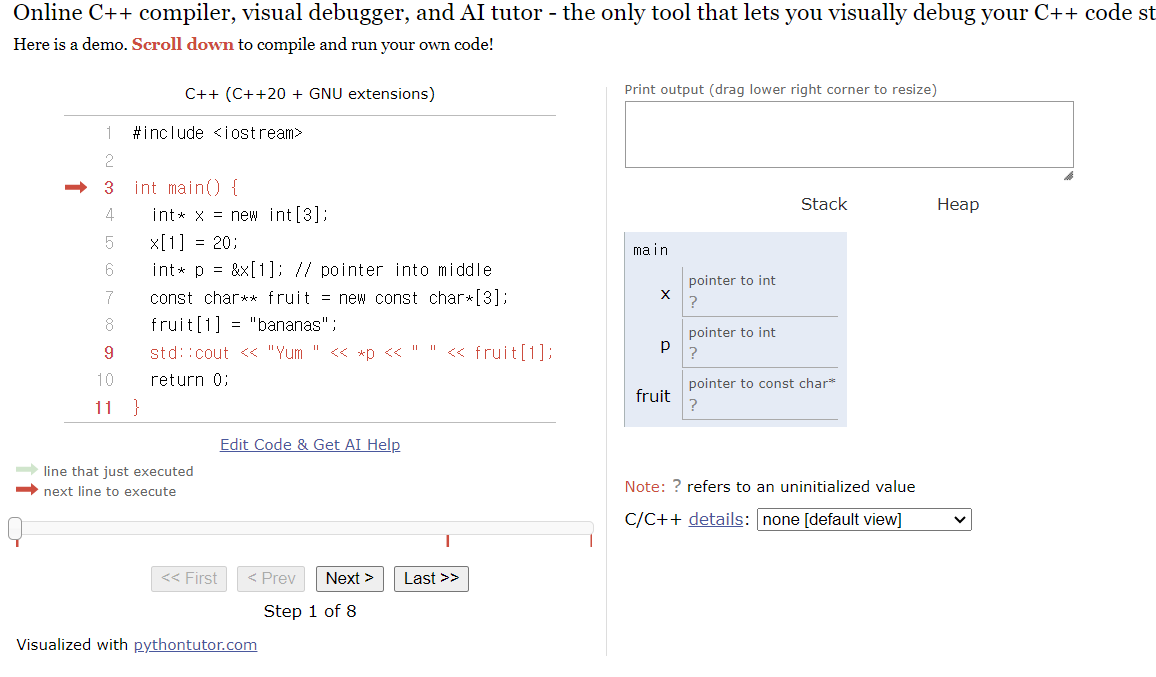
-대괄호 쓰는거 주의하기
-new를 사용하면 반드시 delete를 써야 한다 , 안쓰면 다른 프로그램에서 사용 불가
-배열의 이름은 배열의 시작 주소이다
ex} int x[3] ={1,2,3} 일때 x는 1이 저장된 곳의 주소
x[0];//1
x[1];//2
x[2];//3
//실습과제
#define _CRT_SECURE_NO_WARNINGS
#include <iostream>
#include <string>
using std::cout;
class Cat {
private: //생략가능
int age;
std::string name;
public:
Cat(int age, std::string n) {
this->age = age;//int age;
name = n;
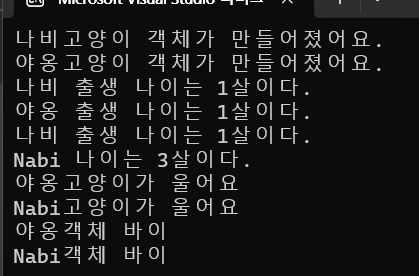
cout << name << "고양이 객체가 만들어졌어요.\n";
}
~Cat() { cout << name << "객체 바이\n"; }; //소멸자
int getAge() const; //변경 안됨
std::string getName()const;
void setAge(int age);
void setName(std::string pName);
void meow()const;
};
int Cat::getAge() const {
return age;
}
void Cat::setAge(int age) {
this->age = age;
}
void Cat::setName(std::string pName) {
name = pName;
}
std::string Cat::getName() const {
return name;
}
void Cat::meow() const {
cout << name << "고양이가 울어요\n";
}
int main() {
Cat nabi(1, "나비"), yaong(1, "야옹"), * pNabi;
cout << nabi.getName() << " 출생 나이는 " << nabi.getAge() << "살이다.\n";
cout << yaong.getName() << " 출생 나이는 " << yaong.getAge() << "살이다.\n";
pNabi = &nabi;
cout << pNabi->getName() << " 출생 나이는 " << pNabi->getAge() << "살이다.\n";
nabi.setName("Nabi");
nabi.setAge(3);
cout << nabi.getName() << " 나이는 " << nabi.getAge() << "살이다.\n";
yaong.meow();
nabi.meow();
return 0;
}
#include <iostream>
class Dog {
private:
	int age;
public:
	int getAge();
	void setAge(int a);
};
int Dog::getAge()
{
	return age;
}
void Dog::setAge(int a)
{
	age = a;
}
int main()
{
	Dog* dp;//배열의 이름은 배열의 시작 주소이다
	dp = new Dog[10]; // 객체배열 할당 배열을 동적으로 할당했을떄는 대괄호를 써야함
	// Dog *dp=new Dog[10];
	if (!dp) {
		std::cout << "메모리할당이 되지 않았습니다.";
		return 1;
	}
	for (int i = 0; i < 10; i++) // C++에서는 가능
		dp[i].setAge(i);
	for (int i = 0; i < 10; i++)
		std::cout << i << "번째 객체의 나이는 " <<
		dp[i].getAge() << " 입니다. " << std::endl;
	delete[]dp;
	return 0;
}
#include <iostream>
using std::cout;
class Dog {
private:
	int age;
public:
	Dog(int a) { age = a; } // 생성자 정의, Dog():age(1){ }, Dog():age{1}{ }
	int getAge() { return age; }
	void setAge(int a) { age = a; }
};
int main()
{
	Dog happy(1), h(2); //happy객체가 생성되는 순간 생성자가 자동 호출됨
	cout << happy.getAge()<<h.getAge();
	return 0;
}
#include <iostream>
class Dog {
private:
	int age;
public:
	int getAge() {
		return age;
	}
	void setAge(int a) {//return값이 없으면 void를 쓴다
		age = a;
	}
};
int main()
{
	Dog happy;
	happy.setAge(3);
	// happy.age = 3;
	std::cout << happy.getAge();
	return 0;
}
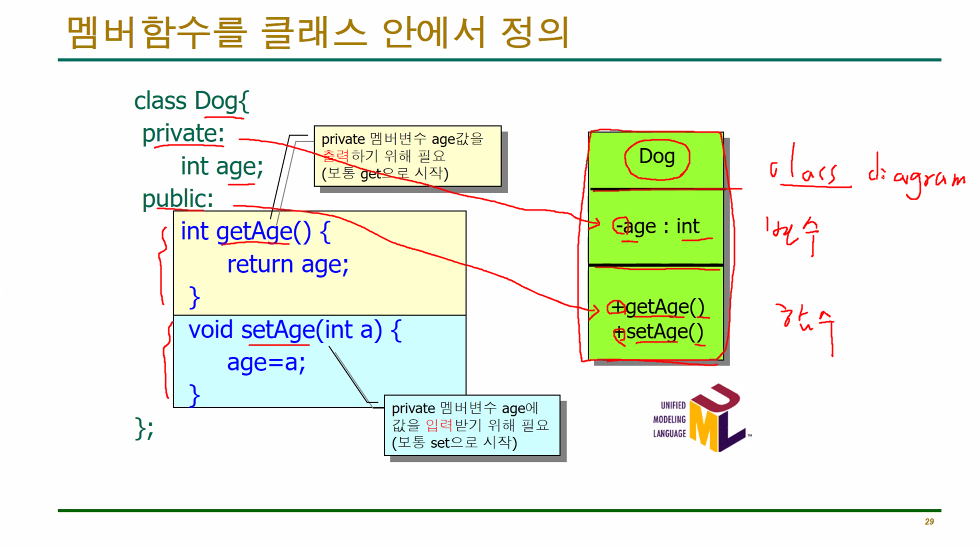
직접참조연산자 : .
-일반 객체가 멤버(변수/함수)에 접근하기 위해 사용
간접참조연산자 : ->
- 포인터 객체가 멤버(변수/함수)에 접근하기 위해 사용
//c++07 ppt 6p오류 수정 후

#include <iostream>
using std::cout;
class Dog {
private:
	int age;
public:
	int getAge();
	void setAge(int a);
};
int Dog::getAge()
{
	return age;
}
void Dog::setAge(int a)
{
	age = a;
}
int main()
{
	Dog happy; // Dog class의 happy객체 정의

	happy.setAge(3); //  happy.setAge(3);
	cout << happy.getAge(); //cout<<happy.getAge()<<'\n';
	return 0;
}
//멍멍~~ 추가
#include <iostream>
using std::cout;
class Dog {
private:
	int age;
public:
	int getAge();
	void setAge(int a);
	void cry() {
		cout << "멍멍~~\n";
	}
};
int Dog::getAge()
{
	return age;
}
void Dog::setAge(int a)
{
	age = a;
}
int main()
{
	Dog happy; // Dog class의 happy객체 정의

	happy.setAge(3); //  happy.setAge(3);
	cout << happy.getAge(); //cout<<happy.getAge()<<'\n';
	happy.cry();
	return 0;
}
#include <iostream>
using std::cout;
class Dog {
private:
	int age;
public:
	int getAge();
	void setAge(int a);
	void cry();
};
void Dog:: cry() {
	cout << "멍멍~~\n";
}
int Dog::getAge()
{
	return age;
}
void Dog::setAge(int a)
{
	age = a;
}
int main()
{
	Dog happy; // Dog class의 happy객체 정의

	happy.setAge(3); //  happy.setAge(3);
	cout << happy.getAge(); //cout<<happy.getAge()<<'\n';
	happy.cry();
	return 0;
}
//7p //using namespace std;주석 처리 했을때, string, cout 앞에 std::붙이기
#include <iostream>
//using namespace std;
class Dog {
private:
	int age;
	double weight;
	std::string name;
public:
	int getAge() {
		return age;
	}
	void setAge(int a) {
		age = a;
	}
	double getWeight() {
		return weight;
	}
	void setWeight(double w) {
		weight = w;
	}
	std::string getName() {
		return name;
	}
	void setName(std::string n) {
		name = n;
	}
};
int main()
{
	Dog happy;
	happy.setAge(3);
	happy.setWeight(3.5);
	happy.setName("해피");
	std::cout << happy.getName() << "는 "
		<< happy.getAge() << "살, "
		<< happy.getWeight() << "kg입니다.\n";
	return 0;
}
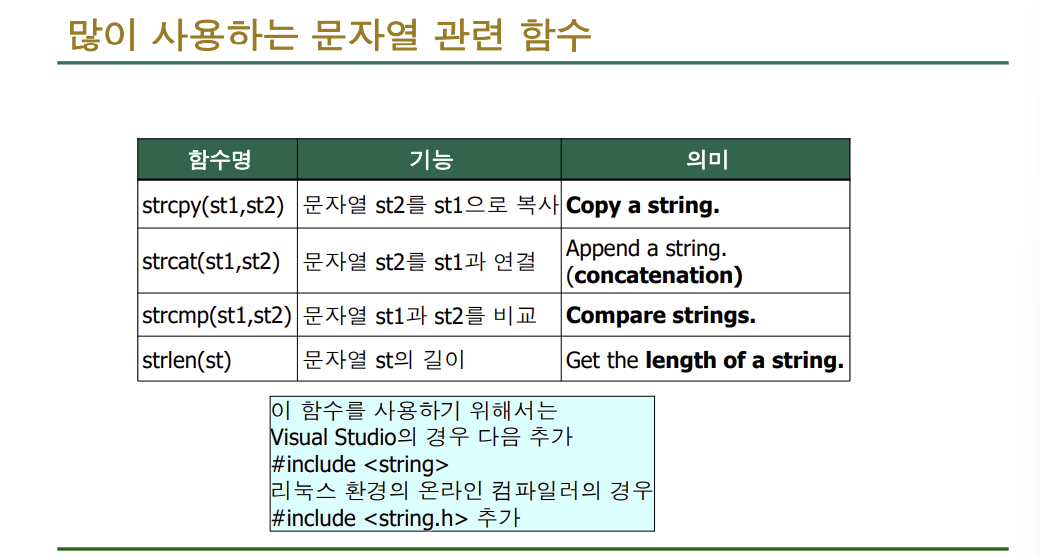
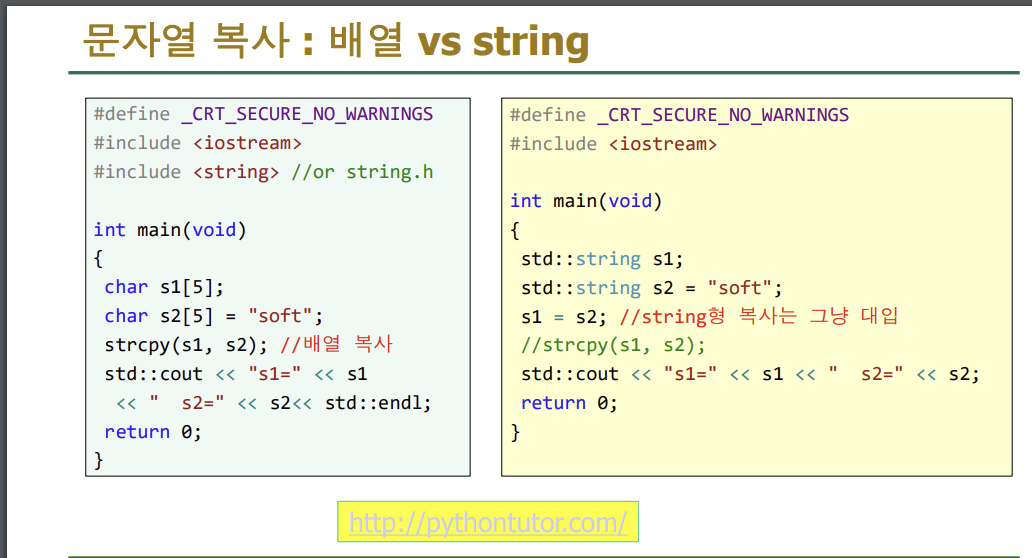
문자열을 복사할떄는 strcpy형태를 사용한다
//배열 복사는 strcpy() 사용
#define _CRT_SECURE_NO_WARNINGS //Visual Studio의 경우
#include <iostream>
#include <string> //or string.h(clang++, gcc 등 주로 온라인 컴파일러)
int main(void)
{
	char s1[5];
	char s2[5] = "soft"; //원본
	//s1 = s2; //error C3863: 배열 형식 'char [5]'은(는) 할당할 수 없습니다.
	strcpy(s1, s2); //s2주소의 문자열을 널 문자를 만날 때까지s1주소로 복사
	std::cout << "s1=" << s1 << " s2=" << s2 << std::endl;
	return 0;
}
p38
#define _CRT_SECURE_NO_WARNINGS
#include <iostream>
#include <string>
using namespace std; //C
class Cat {
private: //생략가능
	int age;
	std::string name; // A
public:
	int getAge();
	std::string getName();
	void setAge(int a);
	void setName(std::string pName);
};
int Cat::getAge()
{
	return age;
}
void Cat::setAge(int a)
{
	age = a;
}
void Cat::setName(std::string pName)
{
	// strcpy(name, pName);//A
	name = pName; //B
}
std::string Cat::getName()
{
	return name;
}
int main()
{
	Cat nabi;
	nabi.setName("나비");
	nabi.setAge(3); //입력
	cout << nabi.getName() << " 나이는"<<nabi.getAge()<<"살이다.";
		return 0;
}
//p39
#include <iostream>
using std::cout;
class Dog {
private:
	int age;
public:
	int getAge() { return age; } //자동 inline함수
	void setAge(int a) { age = a; } //자동 inline함수
};
int main()
{
	int i;
	Dog dd[5]; //Dog클래스형 객체배열 dd, 강아지 5마리
	for (i = 0; i < 5; i++) {
		dd[i].setAge(1);
		cout << dd[i].getAge(); //01234
	}
	return 0;
}
//p40
#include <iostream>
using std::cout;
class Dog {
private:
	int age;
public:
	int getAge() { return age; }
	void setAge(int a) { age = a; }
};
int main()
{
	Dog happy, * pd; //일반 객체 happy와 포인터 객체 pd, int x, *px;
	pd = &happy; //px=&x;
	happy.setAge(5); //일반 객체는 '.'으로 멤버를 접근 (중요)
	cout << happy.getAge() << pd->getAge(); //포인터 객체는 '->'로 멤버를 접근(중요)
	pd->setAge(2);
	cout << happy.getAge() << pd->getAge();
	return 0;
}
p48
#include <iostream>
using std::cout;
class Dog {
private:
	int age;
public:
	//Dog(){age = 1;} //아래 두개 포함해서 3개는 같은 소스이다
	//Dog() : age (1) {};
	Dog() : age { 1 } {};
//	Dog() { age = 1; } // 생성자 정의, Dog():age(1){ }, Dog():age{1}{ }
	int getAge() { return age; }
	void setAge(int a) { age = a; }
};
int main()
{
	Dog happy, happy1; //happy객체가 생성되는 순간 생성자가 자동 호출됨
	cout << happy.getAge();
	cout << happy1.getAge();
	return 0;
}
#include <iostream>
using std::cout;
class Dog {
private:
	int age;
public:
	Dog(){age = 1;}
	int getAge() { return age; }
	void setAge(int a) { age = a; }
};
int main()
{
	Dog happy, happy1; //happy객체가 생성되는 순간 생성자가 자동 호출됨
	cout << happy.getAge();
	cout << happy1.getAge();
	return 0;
}
#include <iostream>
using std::cout;
class Dog {
private:
	int age;
public:
	Dog();
	int getAge();
	void setAge(int a);
};
Dog::Dog() {
	age = 1;
}
int Dog::getAge() { return age; }
void Dog::setAge(int a) { age = a; }
int main()
{
	Dog happy; //happy객체가 생성되는 순간 생성자가 자동 호출됨
	cout << happy.getAge();
	return 0;
}
C++에서 변수를 초기화하는 방법
#include <iostream>
int main()
{
	int x = 1; //copy initialization,비추
	int y(2);//direct initialization, 괄호 안에 초기값 지정
	int z{ 3 };//Uniform initialization, C++11, 중괄호 안에 초기값 지정
	int z1{};//Uniform initialization, 자동으로 0,C++11
	std::cout << x << y << z << z1;
}
#include <iostream>
using std::cout;
class Dog {
private:
	int age;
public:
	Dog(int age) {
		this -> age = age;
	}
	~Dog() { cout << "소멸\n"; }
	int getAge() { return age; }
	void setAge(int age) {
		this->age = age; //현재 클래스에 멤버 변수인 age를 가르킬 때는 앞에 this->를 쓴다.
	}
};
int main()
{
	Dog happy(1), h(2); //happy객체가 생성되는 순간 생성자가 자동 호출됨
	cout << happy.getAge()<<h.getAge();
	return 0;
}
#include <iostream>
class Man {
private:

    int age;
    double weight;
public:
    int getAge();
    void setAge(int a);
    double getWeight();
    void setWeight(double w);
};

int Man::getAge() { //소속을 밝혀야함 Man::
    return age;
}
void Man::setAge(int a) {
    age = a;
}
double Man:: getWeight() {
    return weight;
}
void Man:: setWeight(double w) {
    weight = w;
}

int main()
{
    Man han; //c언어에서는 struct써야함
  //  han.age = 10; //'Man::age' : private 멤버('Man' 클래스에서 선언)에 액세스할 수 없습니다.
    han.setAge(5); //5살이야
    han.setWeight(30.5);
    std::cout << han.getAge() <<"   "<< han.getWeight() << std::endl;
}
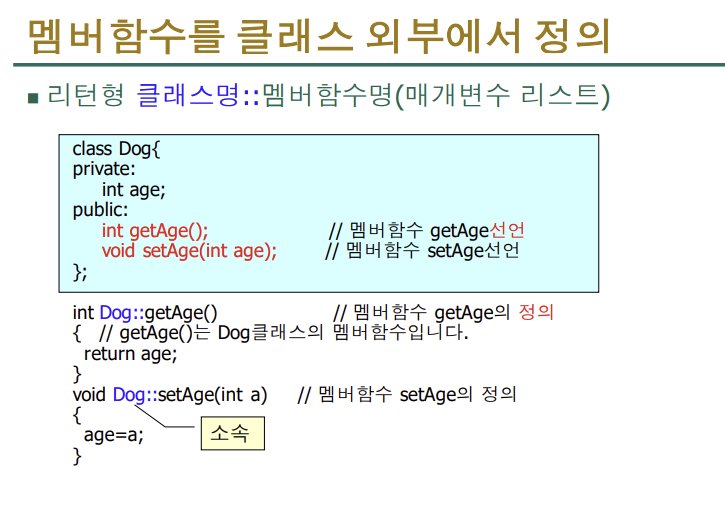
*밖으로 내보낼때는 소속을 적어야함
* '::' 연산자(범위 지정 연산자) : 어떤 클래스 소속인지 나타낼때/ 변수 앞에 ::을 찍으면 지역변수가 아닌 전역변수를 접근할 떄 씀
<inline함수>
#include<iostream>
using std::cout;
#define sum(i, j) (i + j) // 매크로함수
inline int iSum
(int i, int j) // inline 함수, 속도 빨리
{
	return i + j;
}
int add(int i, int j) // 일반 함수
{
	return i + j;
}
int main() {
		cout << sum(10, 20) /2 << ","; //10+20/2, 매크로함수의 부작용
		cout <<iSum(10, 20) /2 << ","; //(10+20) /2
		cout << add(10, 20) /2; //(10+20) /2
		return 0;
}
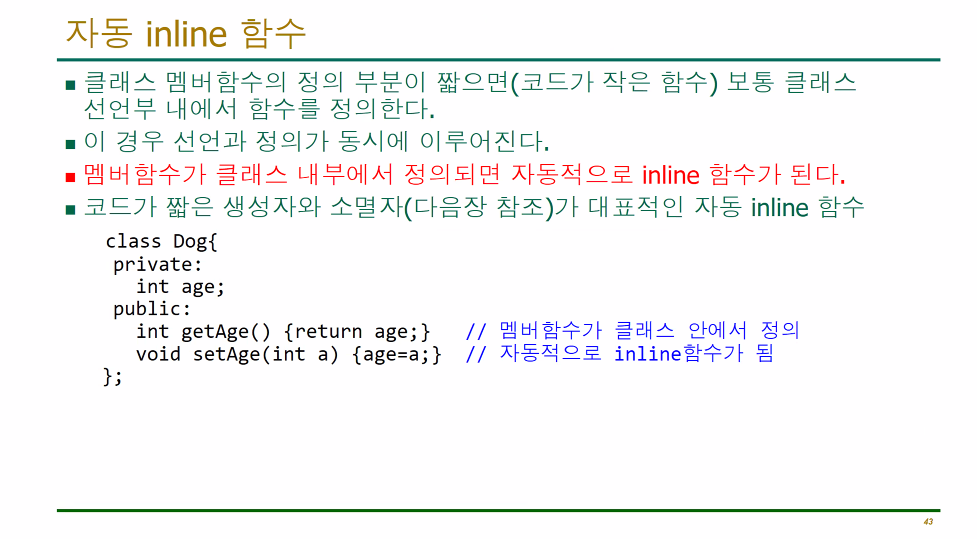
*멤버 함수를 클래스 내부에 정의하면 자동 inline함수가 된다.
//수정전
#include<iostream>
using std::cout;
class Dog {
private:
int age;
public:
int getAge();
void setAge(int a);
};
int Dog::getAge() { return age; }
void Dog::setAge
(int a)
{
	age = a;
}
int main() {
	Dog happy; // Dog class의 happy객체 정의
	Dog.age=2; //① Dog는 class
	happy.age=3; //② age는 private멤버로 클래스 밖에서 접근 불가
	cout << happy.age; //③ age는 전용멤버로 접근 불가
		return 0;


}


//수정후
#include<iostream>
using std::cout;
class Dog {
private:
int age;
public:
int getAge();
void setAge(int a);
};
int Dog::getAge() { return age; }
void Dog::setAge
(int a)
{
	age = a;
}
int main() {
	Dog happy; // Dog class의 happy객체 정의

	happy.setAge(3); //② age는 private멤버로 클래스 밖에서 접근 불가
	cout << happy.getAge(); //③ age는 전용멤버로 접근 불가
	return 0;


}